Installing Ubuntu With Windows as Dual Boot
My friends asked me “how to install Ubuntu as dual boot” with Windows. So I thought of writing a tutorial on installing Ubuntu along with Windows. For this you need to download an Ubuntu version from Ubuntu repository. You can download the latest versions from this link . .If your system is using a 64 bit processor then suggest downloading a 64 bit version of Ubuntu. This will download an iso file to your system. Then you need a DVD writing software something like Nero or Ashampoo. Here are few tutorials about writing iso to a DVD with Nero or Ashampoo.
Once your DVD is ready then you need to find around 30-40 GB in you HDD ( you can install with 10 gb also, but for safe and regular use I prefer 30-40 GB).
Here is the step by step guide to create space in Windows7 or with visa.
1. Open the Control Panel (All Items view), and click on the Administrative Tools icon. Then close the Control Panel window.
2. Click on Computer Management in Administrative Tools, and close the Administrative Tools window.
3. In the left pane under Storage, click on Disk Management.
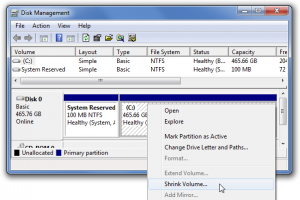
4. In the middle pane, right click on the partition that you want to shrink and click on Shrink Volume.
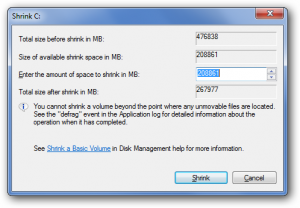
5. Type how many MB (1 GB = 1024 MB) of the available shrink space you want to shrink or volume by to be used for the new unallocated space, then click on the Shrink button.
6. The selected partition (step 4) has now been shrunk to create a new empty unallocated space. You can use this new unallocated space to create a new partition with.
Or if you are using Windows XP or Windows 7 and if you need more stable application to do this same operation, use ALL-IN-ONE Partition Manager Software by partition-tool. Here is the download link and go for Home version and its 100% free for personal use.
Here is the help for using this tool.
Now we are ready to install Ubuntu in your system, a reboot is required, before reboot you can place the DVD in to DVD drive. Once system power up, you will see the bios startup where you will have an option to choose boot disk options. Mostly F12 will be the key for selecting boot disk. Otherwise you can enter into bios and change the boot priority to DVD Drive. Once you have changed the boot priority to DVD, system will boot from Ubuntu DVD image.
1: In this screen you can select option to Install Ubuntu.
2: In this page you have two options: download package updates and third party software install. I prefer switch on both if you have a decent speed internet. Otherwise turn off both options.
3: Now we have two options erase and install and something else. Choose something else.
4: Then you have three options side by side with Windows; replace windows with Ubuntu or something else. Choose something else here too.
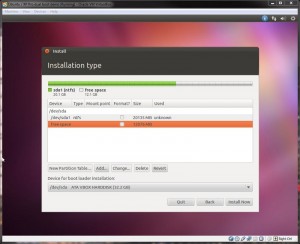
5: Now you will see a window like this.
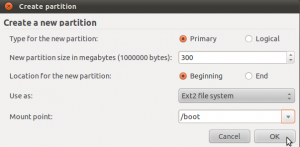
Here you can see your free space and press Add. Then it will bring a new Window. We are now going to create a boot partition. And the Window will look like this.
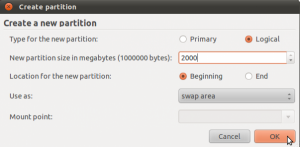
Once you press ok it will bring you back to the same partition page. Then you can select add again for creating swap area. Please see the wiki link to learn more about swap. And the Swap file size more related with the memory you have in your system. If you have 2 GB you can give swap 4068 MB. And swap creation Window looks like this.
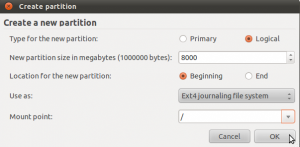
After creating swap you have to go back to the partition page and again you need to go for add button. Now we are creating the file system for Linux. Here we can select the mount point “/” and keep the size as it as in the box. Window will look like this.
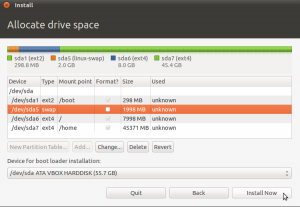
After creating the ‘/’ area your partition page will look like this.
So now we are ready to go for the next step. We can now go for Install now option in the current page.
6: We need to select the time zone.
7: After that we need to select the keyboard layout.
8: Then you have the option to tell about your system. Require my password and encrypt my home folder both will give more security to your system.
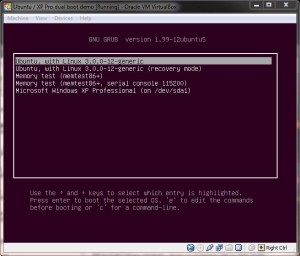
9: The rest will be done by the system. Once installing is finished it will ask for a reboot. Now you can remove the DVD and go for reboot. After reboot you will be taken to the grub menu where you have the option to choose Linux or Windows to boot. And the screen looks like this.
Here you can select Ubuntu generic and you are in the free software world.
Notes:
Notes:
People doubt that after installing dual boot Windows will stay as same or not, yes your Windows installation will stay as same and you will get option in grub (start screen) to select.
Screen capture credit to http://www.linuxbsdos.com/ and http://www.techspot.com/
Partition screens from http://www.sevenforums.com/
All names and legal trademarks belong to the respective owners.
